Sights come in three types: fixed, adjustable, and optical. Fixed and adjustable sights are referred to generically as “iron” sights. Originally envisioned as auxiliary sights for long guns, and having served well in that capacity, optical sights on a handgun, referred to as “carry optics,” have been adapted to meet the rigorous demands of handgun use.
Following an industry-wide trend, many federal and civilian law enforcement agencies are converting their duty pistols from iron sights to carry optics. Defensive and competitive handgun shooters are also steadily converting to carry optics. Relevant to these conversions, this article provides a technical and comparative perspective of carry optics versus iron sights.
Given hearsay about carry optics versus irons, we will steer clear of the rumor mill and take a deep dive into the carry optics rabbit hole from a purely technical perspective to include mechanical and operational readiness.
Carry Optic Models
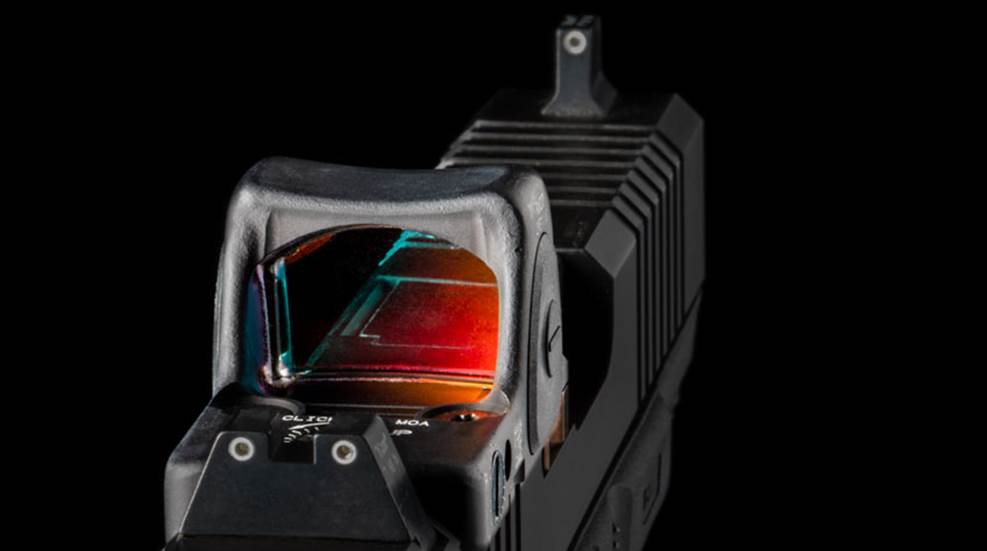
Carry optic (CO) models come in a wide variety of shapes, sizes, features and functionality. Certain features such as reticle configuration, brightness adjustability, window size, MOA, battery access, and slide mounts are specific to each model and manufacturer.
Some readily available optics include: the DeltaPoint Pro by Leupold, SIG Romeo Red Dot Systems (RDS) models, Trijicon SRO, Vortex Venom, Holosun 507C, plus various models available from Burris, SwampFox, EOTech, Steiner, Trybe Shield Sights, and others. A convenient one-stop shop to peruse various models is OpticsPlanet.com.
Mounts
The first and foremost consideration in deciding on a CO is the handgun upon which it is mounted. Some firearms manufacturers produce specific handgun CO models such as the SIG P320 X5, the CZ Shadow 2, the Glock G34, the Smith & Wesson M&P 9C.O.R.E./L, the Walther Q5 Steel Frame and the Springfield Armory Hellcat OSP, XD-M Elite OSP and XDS Mod 2. OSP models to name a few.
Each of the dedicated CO handguns have factory cut slides and mounting plates specific to that gun and CO model. For non-CO-dedicated pistols, skilled gunsmiths can mill a precision slide cut to fit your chosen CO. You can even find universal mounting plates that will fit most models.
The parts needed to mount a CO include the unit itself, its mounting plate, a factory cut or custom milled slide to include the tapped screw holes and the set screws designed for that configuration for fastening the plate to the slide and the CO to the plate. Whether factory cut or custom milled the mounting plates need to be properly secured to the slide. Special care should be taken to utilize the exact mounting screws provided for length and torque. Installation instructions include the type of Loctite (or equivalent) and torque screwdriver setting. Care should be taken to not strip the thread on the set screws, mounting plate, or slide.
Durability
Most iron sights are very well secured to the slide and to make any zeroing corrections requires a sight adjustment tool. Non-adjustable or fixed iron sights can be cumbersome to zero. Some front and rear sights are set so securely that they can only be hammered out of the dovetail to change out. One cannot deny the durability of iron sights.
Durability of a CO translates to quality of materials, manufacturing, internal electronics, and holographic technologies. Unlike their RDS counterparts mounted on a long gun, COs are mounted to a reciprocating slide and are subjected to incomparably more operational stress.
A CO must endure the impingement of multiple and continuous force vectors (kinetic energy transfer in changing directions) created by the sudden acceleration on firing, the stop, and then the forward slam into battery. All of which can do very unkind things to delicate internal electronic components. Surviving the slide ride is a durability consideration and every bit as important as a proper contact mount.
Reliability
Iron sights advocates are justified in claiming that irons don’t run out of batteries, have no glass that can crack, seldom loosen from their fixed mounts and are less likely to lose zero.
To further support this claim, at the onset of CO production, you often heard “You’ve got to have two on hand because they are either ‘broken or about to break.’” Back then, more shooters than not would pretty much agree. Today, however, as materials and construction continue to improve this becomes less and less an accurate assessment. Yes, the risk of shattered glass, and varied effects of extreme inclement weather cannot be discarded, but the fact that CO reliability remains commensurate with technological advances cannot be denied.
In anticipation of such catastrophic failure, carry optics are often mounted (and co-witnessed) with either CO backup (fixed or flip-up) or suppressor iron sights allowing for emergency visual transition.
Concealed Carry
Looking at it from the viewpoint of a concealed carry defensive shooter who is considering a CO for their everyday carry (EDC) there are a few points of concern to be addressed. Larger than iron sights, carry optics, are set higher than irons. Some shooters wrestle with the CO feeling somewhat cumbersome and weighing more than irons. Window size and overall unit profile are a consideration for those who may be concerned with printing. Still others weigh out the value of longevity in terms of battery replacement and dot brightness based on changes in environmental conditions such as no or low light.
Lighting Conditions
CO dot size and brightness can be manually or automatically adjusted (auto-adjust). The reticle image (dot, circle, triangle, etc.) choices vary and are available in range anywhere from 2 – 64 MOA.
Bright light, looking directly into or in the direction of sunlight sucks for both irons and carry optics. However, with a CO the dot is sometimes “doubled” on certain models by the bright light where the glass become hazy and difficult to see through. As the environment lightens or darkens you can manually or auto-adjust to compensate – something you can’t do with irons.
Low light performance of the CO far outweighs that of iron sights. Instead of adding steps to the shooting process such as trying to discern sight shapes in darkness or align embedded glowing shapes you simply keep your eyes focused on the target and superimpose the already-lit reticle directly onto that target.
Mechanical Offset
Like that of a long gun RDS, mechanical offset, although usually not as tall as a rifle, applies to the CO. Dot height is measured from the center of the zeroed image to bore line center. The lower the dot the lower the profile and less mechanical offset. A deeper slide cut helps with a low-profile design conducive to concealed carry and minimal mechanical offset.
Operational Readiness
One of the CO murmurs often heard is that “red dots are more accurate and easier to shoot.” Technically speaking there are certain advantages as illustrated here, but as there is no free lunch, every advantage comes at a cost. Iron sight shooters electing to convert to carry optics must become familiar and comfortable with radical changes in their shooting process. The most significant of these being fundamental alignment factors such as extended sight radius, focal plane shift and rapid dot acquisition.
Extended Sight Radius
Sight radius is the distance between the rear and front sight of a rifle or pistol. An accurate sight radius is measured from the face of the front sight to the back of the rear sight. The closer they are to each other, the smaller the sight radius. The further they are from each other the larger the sight radius.
Generally, a bigger gun has a larger sight radius. A long gun will have a larger radius than a full-size pistol and the full-size pistol will have a larger radius than a sub-compact pistol. Getting deeper into the weeds, the bullet deflection over distance is calculated as Tangent (barrel angle measured from intended point of impact) x Distance to Target = Bullet Deflection and is greater when the distance variable is increased.
A successful shooting process is to align the muzzle with the target and break the shot without disturbing that orientation. Any error will be due to misalignment during that break. To most shooters those errors (caused by movement) are far more difficult to see with a shorter sight radius.
“You can’t fix something you can’t see.”
Increase the distance between the sights, however, and you’ll detect even more movement reflected in your sight picture. It’s not that a longer sight radius gives you any better accuracy, but because you can observe more movement you know to make adjustments.
The advantage is that the longer the sight radius, the less impact of each second of angle of aiming error. Now imagine if you were to extend that sight radius from the back of your rear sight out past your front sight and all the way out until it touched the target. It’s not possible to get any longer of a sight radius nor could you possibly ask for any better visibility of movement. The pro is that unlike iron sights carry optics extend your sight radius directly to the target offering you both optimal sight radius and maximum observability. The con is that it looks like watching a heart monitor bouncing all over the target.
Visible Arc of Wobble
All that bouncing around with a CO is your visible arc of wobble. At first it can be quite discerning as you can’t see as much movement with your irons. The trick is to try to be comfortable with the uncomfortable. Grandmaster shooter and Master Instructor Rob Leatham advises “Tolerate being uncomfortable to the point it doesn’t impact you.”
Controlling the gun using carry optics is about comfortably setting your acceptable arc of wobble margins and staying within those margins. Learn how to reduce visual chaos to produce an acceptable margin of error and in the least amount of time.
Visual Process
Another important element of CO use is target focus. Placing the dot on a target is a two dimensional (2D) visual process where you have only two focal points – the target and the dot. Using irons is a three dimensional (3D) visual process where you have three focal points – the rear sight, the front sight and the target. Using the 2D visual process you maintain single-point target focus and allow the hologram to superimpose itself on the target. Look at the target and not at the dot. Look through the hologram.
Focal Plane Shift
In addition to a 3D visual process, making a technical shot using iron sights, also requires multiple shifts in visual focal planes. Using a defensive shooting example, first and foremost is target identification. You must first bring your visual focal plane outward to look at the target and determine shoot or no shoot status. If you’ve decided to shoot (not talking point shooting here but sighted fire), then your focal plane must return near or to the front sight to align with the rear sight while you press through the shot. After firing your focal plane goes back out to assess target condition for a total of at least two focal shifts.
Making a technical shot using carry optics requires only one shift in visual focus and that is to identify the target. You must bring your focal plane to look at the target and determine shoot or no shoot status. If you’ve decided to shoot (again, not talking point shooting here but sighted fire), then your focal plane stays right where it is on the target and you superimpose your dot over that target and press. Removing the need for multiple focal shifts provides four significant shooting advantages:
- Shortens the number of steps in the shooting process
- Affords you a 2D visual process versus a 3D visual process
- Saves you valuable tenths of a second in a gunfight
- Affords you unbroken eye contact with the target
Shooters suffering from physiological insufficiency of accommodation associated with the aging of the eye resulting in progressively worsening ability to focus are afforded an additional advantage in using a CO.
Rapid Acquisition
Rapid dot acquisition starting from support-hand only at the low ready position, strong hand only or both hands drawing from the holster (presentations) up close and at high speed (e.g., sub-1-second head shots from the 5-yard line) can prove challenging without adequate CO training and experience.
Looking for the dot at breakneck speeds is like trying to find a sewing needle in a football stadium. It is recommended to start training with the dot turned off and just use the window to make alignment happen. Find that sweet spot with no dot. Become familiar with picking up the window frame and the dot will magically appear. A common rapid dot acquisition process is to pick up a block object (any part of the slide) that enters your field of vision (or peripheral vision) then focus on superimposition of the window frame on the target and the dot will appear in the window in the center of the frame. The recommended sequence of events is peripheral/ field of vision, window frame alignment and then dot – not the other way around.
Visual Control
Losing the dot when shooting is a common complaint of CO shooters. Rapid dot acquisition from the holster and maintaining visual dot control during splits (multiple rapid-fire hits on the same target) or transitions (multiple rapid-fire hits on more than one target) are common conditions where dots can be easily lost. Dot loss is commensurate with loss of control.
“More important than breaking the shot is controlling the gun.”
– Rob Leatham
The CO helps your body teach you how to keep a “flat slide plane” from the holster, from support hand only at the low ready position, strong hand only and both hands from the low ready position. Applying your flat slide plane skills means applying better gun control which in turn translates to maintaining better visual control of your dot during recoil recovery, splits and transitions.
Training Tool
CO systems are a superb training tool for those shooters seeking to improve their on-demand performance. They allow you to readily check your work (observe what happens after you press off the shot). Did the dot lift to the 11:00 O’clock position, the 1 O’clock position or did it consistently stay in that perfect 6 – 12 O’clock grove as you intended? They help your body teach you how to build and maintain a flat slide plane. They afford you optimal sight radius and maximum observability from which you can learn to rapidly acquire an acceptable arc of wobble. Demanding a high degree of visual control, carry optics provide a mechanically and operationally sound shooting platform to help you become a better shooter.